
In July of last year, we had some friends aboard Dawn Treader for the weekend. In preparation, I filled the water tank for the first time since I’d bought the boat. Soon after, the bilge pump began cycling on and off. Something was obviously leaking. I went to the forward cabin where the water tank was stored and pulled up the inspection port in the floorboards. This revealed the expected drain valve and in-line filter, both of which were fine. But, beneath those, it also revealed a steady stream of water flowing from somewhere under the tank. Crap.
A week or two later, I pulled the v-berth apart and saw that someone before me had obviously done a fair bit of work to the tank…

6 ports had been cut in (between the internal baffles) and had been resealed with caulk, rubber sheeting and screwed-down plexiglass…

Not really knowing what to do at that point, I looked at the information on the tank to see about a replacement…

After a bit of Google-Fu and measuring, I found out the following:
- The boat was basically “built around” this thing. No way I was getting it out without either cutting it up, or pulling the interior apart. And even then, getting it out (or a new one in) through the companionway was seriously iffy.
- A plastic replacement tank with this capacity was going to run from $800 to $1,000+ (in addition to the cost for removing the existing one). But could I even find one configured to the right shape? Or would I have to get multiple tanks and figure out how to plumb them – or get a custom tank made for even more? Yeesh.
- Holes in an aluminum tank can be repaired with a weld – but how would you do it in this case with the tank in place and not accessible?
- I’d seen epoxy mentioned in some of the forums, but typically for repairing single holes, etc.
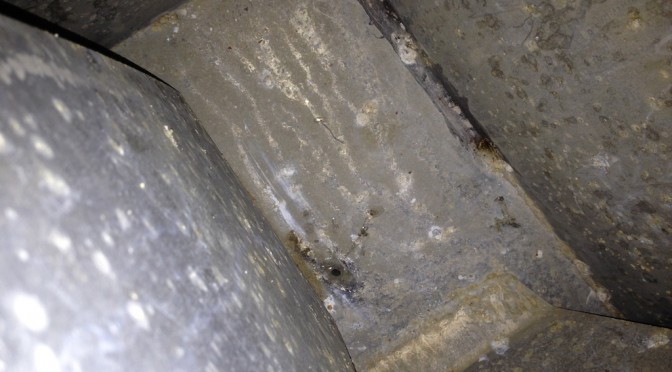
So, I knew I had to at least figure out what the problem was and see if I could salvage this beast. I pulled the access covers off and immediately saw the general issue. This thing was seriously pitted…

Walls, floor, baffles, all of it…

After some research, I discovered that this corrosion happens due to the interaction of chlorine in the tap water with the aluminum. If you’ve got an aluminum water tank – you’ve got pitting. So it’s just a matter of time until you’re in this same situation (sorry to be a buzzkill).
It was impossible to tell how many of these pits went all the way through and were actually leaking, but I could tell that the leak started when the tank was about 1/4 full. Then I spotted an actual hole – all the way through the metal – in the forward upper chamber of the tank…

Thinking I had solved the mystery, I laid in a dab of epoxy, let it cure, then tried another fill. Everything was dry until the tank was about 2/3 full. Then she started leaking like a sieve yet again. Was it other small holes on the floor of the tank, the walls, the seams? Impossible to know.
It was time for a wholesale solution.
More GoogleFu led me to this stuff…

It’s a solvent-free coating from 3M Scotchkote specifically formulated for drinking water tanks and pipes and is typically used in municipal water systems. It’s rated for coating metals such as steel and aluminum. It seemed like a great solution. This would seal all the holes, from the inside, protect the metal from any further pitting, and allow me to keep this tank for another several thousand years. The cost was $120 per 1-liter kit. The place I bought it from estimated that I’d need 2 kits. I ordered 3 because I figured I’d be a little sloppy. So, for $360 this was looking to be a pretty affordable and practical repair.
First, I sanded the interior of the tank as best I could (it wasn’t easy reaching through the ports to get to the surfaces)…


I couldn’t get down into the pits to get everything out, but I was able to get the rough stuff off and surfaces pretty smooth.
Next, I mixed a bowl-full of the stuff at the directed 2:1…

Then I went around the corners of the tank and edges of the baffles with a foam brush…


I put a total of 4 coats on these corners, then let it cure for a couple of weeks until we came back to the boat. Then it was time to slather the whole thing Smurf blue.
I placed a cork into the outlet on the bottom of the tank, mixed another bowl, Jackson Pollocked a wall and floor area, and used a 4″ sponge roller to spread it evenly. I rolled 3 coats onto all the surfaces, then let it cure for another couple of weeks.
Then came the moment of truth. I filled the tank to just shy of full – then marked just above the water line and went to bed. The next morning…

Booyah! No leaks whatsoever. I then drained the tank for a final cleanout, and filled it again for our upcoming trip. I’ll let you know how it works out in terms of longevity and taste, smell, etc. But I’m not too worried about the latter as we have a Britta filter on the galley tap for drinking water. It works pretty well.
A bit more in the video here…
The last thing I did this weekend was replace the running lights with LED versions…

I got them FROM AMAZON for a total of $120 (a pretty damn good deal for CG rated lights).
I had been drawing about 4 amps with the old lights. I was now drawing less than 0.5. That’s what I’m talkin’ about!
So, all in all, a couple of very successful projects on the Dawn Treader.
Coming up – The Labor Day Offshore. Stay tuned.
BFS Gear for this adventure:
![]()
“Great service! The team was professional, prompt, and fixed our water tank efficiently. They explained the problem clearly and offered practical maintenance tips to prevent future issues. Highly recommend this service for anyone needing water tank repairs or maintenance!”
Steve, Excellent post. just wondering how the water tank repair is holding up. Its been 8 years since you coated the tank. Interesting to see if the repair is still holding up.
Thanks
Mitch
Hey Mitchell – it’s been a long while since I’ve been on this blog. But I appreciate your comment. The epoxy treatment held up perfectly for several years. I sold the boat in 2019 and that new owner pulled the tank out and did something different with that space. But I wouldn’t hesitate to recommend it. It’s a great fix – good enough for water departments all over the country to use for their drinking water supply lines. And it just make perfect sense to build up that coat on the interior, using the tank itself as the supporting structure. You have to have A LOT of big holes for this not to work. Don’t replace pitting, leaking metal tanks if you can epoxy them instead.
Steve,
I happened to follow the link from your exchange with Doc Poulson over at SailNet. These are a lot of fun and very well done. I am not sure how you got on Camper, but I am eating my heart out, but purely in the metaphoric sense.
Jeff
Thanks Jeff! Camper was very cool. I can’t yet say why I was on it – hopefully soon.