
The Mr. Universe of Nav Systems!

So, for a chartplotter, the boat came with a seriously old Hammerhead computer with Windows 97 and some crappy charting software. And there was a super cheesy “navpod” (actually an aluminum project box) at the helm with the horn and AP controls. We could definitely do better.
I have all Raymarine instruments and auto-pilot (AP). And I have a JRC 1500 radar unit with display at the nav station. Now, something like the new Raymarine e97 chartplotter is…ready?…$3,000!!! That’s just insane. Sure, you could drop down to something like the c97 at “just” $1,800 – but still…insane. Then you still have the chart chips to pay for, then not drop them in the water, etc.
Compare those prices to a brand new iPad Air (with Cellular for the GPS) at $630 (or a used iPad 2 for around $250) and the iNavX application at $50. And if you’re happy with the free NOAA charts, you now have a fairly full-featured chartplotter for WAY under $700! Not bad. If you want a more detailed set of charts, you can spring for the Navionics for a $10/year membership fee, and $20-$90 for each region. Both the app and the charts are continually kept current through ongoing updates. No chips, just guac. Oh yeah.
So that was my first step as you can see in the photo below. The iPad is in a fully waterproof Lifedge case that still gives me the screen interaction needed for panning/zooming. I ordered the rail-mount as well, and we were up and running for around $250 additional.

So we were now at around $1,000 for 2 fully functioning chartplotters (the iPad and my iPhone)…with the ability to add two more for only $50 additional. AND, most importantly, our chartplotters could be anywhere on the boat at any time – mounted or not – while also acting as media player, email, web browser, telephone, work computer, calculator, log, notepad, photo/video camera, flashlight, game console, you name it. What’s not to like?
Of course, this wasn’t quite enough for me. I wanted FULL integration with our boat’s systems. Or, at least as I close as I could get to it.
I knew the JRC 1500 radar would have to remain a standalone unit. I definitely preferred having radar at the helm as I’ve been through those unlit oil rigs at night many times now. But even if I bought the $3K Raymarine chartplotter, I’d still have to replace the radar to integrate. So, we’d just have to make do for now.
More importantly to me, I wanted all the Raymarine instrumentation integrated with iNavX so I could have a full heads-up display of wind, speed, depth, temp, etc. – and be able to drive the boat via the AP from the chartplotter . I also wanted AIS overlay. So – how to do all that?
I had heard about the Brookhouse Imux, a WiFi NMEA 0183 multiplexer for the iPad that was designed for the iNavx chartplotting application we were using. I did quite a bit of research on it and some competing products such as Digital Yacht’s iAIS wireless receiver. I came very close to buying the latter as it seemed to have everything I needed…AIS, NMEA 0183, etc. However, there were two issues that remained…the GPS and the VHF. I wanted to keep the GPS installation as simple as possible. All our iDevices already had integrated GPS, so we had plenty of backup and I saw no reason to go crazy installing an expensive “marine grade” unit. However, the iAIS obviously needed GPS input – but was wired for a typical marine grade setup. Also, the DSC function of the VHF requires GPS coordinates to be effective…so I needed a way to get GPS into that system as well.
That’s when I came across this post: Navigation System of The Gods. This blog guy had gone down pretty much the exact same road I was on – and had come up with a very cool, very cost-effective solution using the iMux (with Seatalk option), an integrated GPS puck, and the Standard Horizon GX2150 VHF radio with integrated AIS ($300). I was sold.
I had heard that ordering the iMux from Brookhouse was iffy. It sounded like they had had some problems fulfilling a quickly growing demand for their product. Granted, they did have a weird ordering system (an email specifying what you want) – but I had no problem getting what I needed…which was the standard unit with Seatalk input and a PS2 input for the GPS puck. Price tag: $400 + $30 for the GPS puck.
The unit finally arrived from New Zealand 3-4 weeks after I ordered it. So, all was good.

It looked like a pretty simple setup. But the above blog post warned that the wiring was a bit of a challenge. I went through the documentation that came with the iMux and immediately saw why. It was clear that the instructions were written for those who knew what they were doing (at least way more than I did). AND the instructions were also relatively vague – simply because there are so many possible ways of hooking this thing up based on the devices you are integrating. It was a bit overwhelming. Undaunted, I knew I could figure it out – or at least get help (hopefully) when I needed it.
So, it was time to start ripping the boat apart. This is where I was starting…the iCOM VHF that would have to come out on the lower right…

and an installation space behind the radar display, with tri-data instrument under Skippy the Fish…

then integration with the AP via SeaTalk…

So, I started ripping stuff out and got to work:

With the tri-data instrument in place, the Seatalk wiring was a snap. The backside of the instrument looked like this…

The “out” cable on the right went to the exterior instruments above the companionway hatch cover. So I cut that cable, used a European Terminal Strip and spliced in the iMux. I turned the power on to the instruments and BOOM – power and signal…and the exterior instruments still worked!

So that part was stupid easy. To see if I was now getting the instruments in iNavX on the iPad, I went through the Network TCP/IP setup laid out in the instructions (my settings were a bit different than those shown in the image below)…

But, as soon as I entered the correct info…BOOM! I now had a chartplotter with integrated instrumentation. That was super cool. I plugged the GPS puck into the PS2 connector on the iMux and I now had coordinates as well…independent of the iPad’s own GPS. We were cookin’!
And now came the hard part: the AIS VHF. I looked at the various wiring diagrams for the GX2150 and at how the blog guy wired his – then compared all this with the installation instructions that came with the iMux. It was pretty confusing to say the least.
I pulled the iCOM radio out of the panel and immediately realized that the hole was bigger than the GX2150 would require. So, I ran over to Walmart and bought a $2 black plastic trash can. I cut out a rectangle of the trash can with nice rounded corners sized so that it would cover the hole, then cut the center out to fit the GX2150. Looked like a pro job…at least from a couple of feet away (see below).


And now came the scary part…the wiring. Based on blog guy’s setup, I pulled this wiring diagram from the GX2150 manual…

What was tricky was that the colors coming out of the radio didn’t match the colors of the Seatalk cable I had on hand. So I had to wing it…

I then wired up the iMux as follows – matching blog guy’s setup…

I flipped on the GX2150, hoping to see coordinates and AIS targets and got this…

Nothing. Bummer. So I tried messing with the baud rate, knowing there were two settings and thinking maybe the other one would work…

Still nothing…
I then tried every wiring and baud rate combination I could think of…


And ended up in exactly the same place…nothing…
Seeing that I was clearly in over my head, I sent an email to Wout Beekhuizen, the owner of Brookhouse. We went back and forth a couple of times and he patiently walked me through what I needed to do. It took a couple of times because I had trouble following his tech speak (he thought I knew what various terms meant when I had no clue). But he never gave up on me, as shown here:
Hi S…,
I think my words in my previous email were misleading, I’m sorry. I may have confused the 2150 with the 2100, which is the model I have here.
Let’s start all over:
1. Select 4800 for GPS input.
2. Connect blue and green wires to iMux 3A / 3B (4800 baud) for GPS input to the radio.
3. Connect grey/brown wires to iMux 2A/2B for DSC/DSE output of the radio at 4800 baud(this will convert DSC/DSE sequence to a waypoint in iNavX)
4. Connect yellow / white wires to iMux 4A / 4B (AIS 38400 baud)
This is also described on page 22 of the GX2150 manual.
I hope this helps.
Regards,
Wout Beekhuizen
Brookhouse
I followed these instructions and BOOM! The VHF now had coords and targets!!
Now it was time to see if that data was broadcasting via the iMux to the iPad. I fired it up and BOOM!!

AIS targets shown in orange and gray. I tapped on one of the targets and got the AIS data for that vessel…

THIS WAS FREAKIN’ COOL!!!!
Now that everything was working, I tucked the iMux into the cabinet behind the radar and screwed it down…

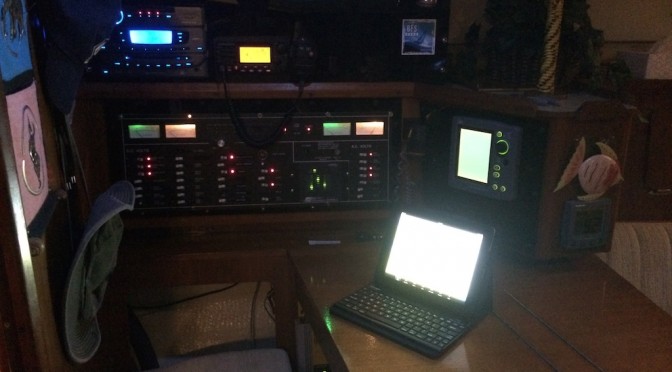
Then I screwed all the panels back into place and BOOM!! I had myself the Mr. Universe of Navigation Systems…

Pimpin’ baby.
So, for about $1,800 all in, I have a super-cool, super-redundant, wireless set of TWO chartplotters with instrumentation – and AIS (about the same price as a single Raymarine c97…without AIS!). I’ll let you know how things work out in terms of reliability and accuracy. So far so good.
Gotta Have The Grill:
The next piece of critical equipment was the Magma. Prices on those things are pretty ridiculous. So, I tuned into the eBay for a few days and BOOM! I scored a 17″ kettle grill in great shape for $50. I then had to buy a rail mount – and found one on eBay for another $40. So for $90 I had a very nice setup – almost like new at WAY under half retail.
The next step was a cover. Again, the choice was to drop another $50 on a new cover, or do it myself for cheaper. It’s a cover, how hard could it be? So I ordered some Sunbrella fabric off of Amazon for $21 (I should have used Sailrite – but oh well) and whipped this thing out over a glass of wine:

A simple drawstring contraption…

And we were rollin’…

Worked like a charm. And it only took 2 days for it to get seriously crapped on by a stupid bird. Oh well, that’s what Sunbrella is for, right?
Head Games:
The aft head had been problematic since I bought the boat. If you recall, this is what it looked like when I first inspected it…

Gaaaa. No more curry.
The problem was two-fold. First, this head had a macerator pump forward in the sink cabinet then the holding tank was aft. So this meant the hose between the head and the tank was pretty long, which meant that when you pumped out the head, a fair amount of water (and nastiness) would flow back into the bowl from the hose. Second, it would bubble like crazy…as if air was getting trapped somewhere. It just wasn’t working.
Knowing very little about heads at that point, I had someone come in and replace the joker valve. And, though he assured me it was fixed as he palmed my cash – it did exactly what it had done before. Glub, glub, glub – curry.
So after thinking about it for a while, I began to suspect there was a problem with the vent hose. It seemed that the bubbles were pressure coming back through the hose from the expanding tank – instead of escaping through the vent. So I pulled the bottom out of the port storage cabinet in the aft cabin, loosened the hose clamp and started to pull the vent hose off when the whole thing fell apart…

As you can see, the fitting was completely corroded and closed. There was absolutely no air getting past that plug. The thing was so corroded, the threads even pulled out like string. So, I put a pvc fitting in, reattached the vent hose, and BOOM! the head was working perfectly.
Bits and Pieces:
A couple of final small projects were the reading lights and the depth instrument. After my previous post on switching all the light fixtures over to cheap LED bulbs…yet not being able to get the LEDs into the reading lights…a buddy named bristol299bob on Sailnet recommended cutting off the outer cover of the LED bulb. I did just that…

And BOOM! it worked like a charm…

Though these bulbs were the cool white color (not cool for my boat) – they’ll do for now until I get the warm white.
The last piece for this post was the depth instrument. Though the numbers were still visible, the screen had burned out as shown here…

I had read on the forums that Raymarine would often fix or replace these things for free if you sent them in. So I thought it was worth a go. I mailed it off and am waiting to hear back. I’ll let you know how it turns out.
So with the above work, the Money Blizzard just keeps on dumping…
Previous Blizzard Total: $59,725.
Above Nav Equipment (including VHF): $1,800
Grill and Cover: $120
New Blizzard Total : $61,645.
Coming Up:
The next BIG project is the water tank. If you recall, it was leaking pretty badly due to severe pitting. I’m just about to finish up the last big push on that.

I’m also adding lazy jacks and fixing the improperly rigged reefing lines…

And I’ve also added a nice NavPod (to replace this old crappy one) and have done some work on the bimini frame…

All that and more coming soon. Plus the countdown to our FIRST OFFSHORE RUN THIS SUMMER – the reason I’m doing all this work in the first place!!!
So stay tuned!

As I rip really good but used stuff out of our boat, I’ll put some of it up for sale here. You can help support our adventures, and SCORE some sweet gear for a killer price! From our yacht to yours…

SOLD!

SOLD!

SOLD!
bit hard to follow now with all the photos gone
Yeah – I had those on Photobucket and they all evaporated at some point. Sorry about that.